| Find in this manual | ||
| Replace with | ||
FHM4's new tactical system is built around four concepts: Tactics, which form the basis of a team's overall system and determine its style of play, Tactical Roles, which control the manner in which individual players approach the game and contribute to the effectiveness of their team's tactics, the Tactical Battle, which takes place in every game and influences the game's outcome by deciding which team is more effective at implementing their system during the game, and Global Tactics, which allow some customization of the team's behaviour, particularly with regard to line selection. Every tactic requires that the team fill specific tactical roles associated with it, and the better a team's players are at filling those roles, the more successful the team will be at playing with that tactic. A small, speedy team won't be very effective at playing a bruising, hard-hitting game, but they may find success with a tactic that emphasizes rapid breakouts and exploiting their speed advantage.
Tactics
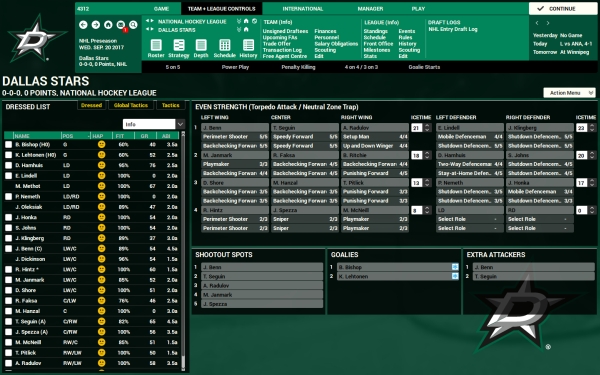
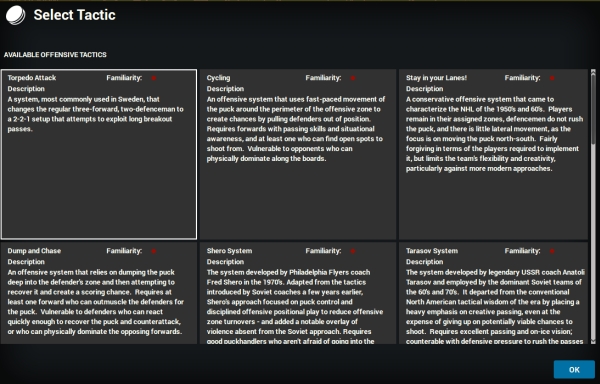
A team's system is built by choosing four tactics: offensive, defensive, power play, and penalty killing. If you're familiar with previous versions of FHM, the tactics are built from the more detailed settings that used to be edited directly, such as specific player locations for each possible puck control situation, and special instructions for the players on how to handle certain situations, like zone entries and forechecking. Now, rather than having to piece together all of that yourself, you can simply choose a prebuilt tactic that will handle the "dirty work" for you.
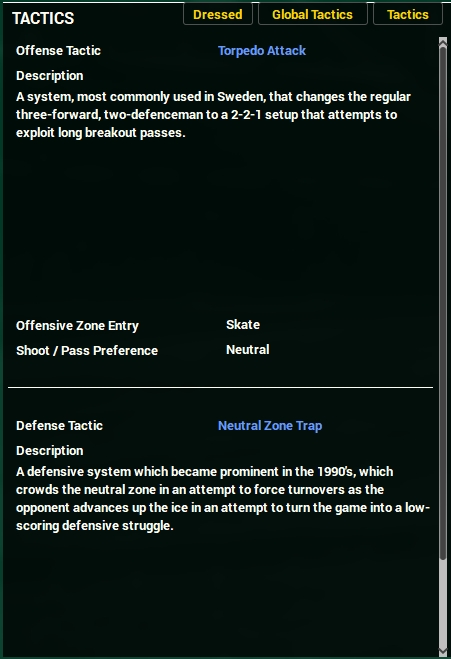
- Offensive Tactic: Guides the team's behaviour while it's in control of the puck during even-strength situations (5-on-5, 4-on-4, or 3-on-3.). This includes breakouts from its own end of the ice, advancing through mid-ice, entry into the offensive zone, and play in the offensive zone. The tactic may place particular emphasis on one or more of those situation. Included are specific instructions on how to enter the offensive zone (skating the puck in, passing it in, or dumping it into the corner) and whether or not the team should tend to shoot more often, sacrifice lower-percentage shots to create higher-percentage chances with a pass, or take a balanced approach.
- Defensive Tactic: Guides the team's behaviour while the opposing team is in control of the puck during even-strength situations (5-on-5, 4-on-4, or 3-on-3.) This includes forechecking, alignments and checking through the neutral zone, and defensive zone coverage. The tactic may place particular emphasis on one or more of those situation. Included are specific instructions on the degree of physical play (lots of hitting and aggressiveness at one end of the scale, avoiding penalties at all costs at the other) and the level of risk the team will take while forechecking (active forechecking that will create more turnovers but also more defensive breakdowns at one end of the scale, a more passive and cautious system at the other end.)
- Power Play Tactic: Guides the team's behaviour while the team is in a power play situation (5-on-4, 5-on-3, or 4-on-3.) This replaces the team's regular offensive behaviour, typically with a more offense-oriented approach that tries to exploit the man advantage. If the team loses control of the puck, some defensive settings are retained from the even-strength defensive tactic.
- Penalty Killing Tactic: Guides the team's behaviour while the team is in a penalty killing situation (4-on-5, 3-on-5, or 3-on-4.) This replaces the team's regular defensive behaviour, typically with a more careful, defense-oriented approach that tries to kill the penalty by disrupting the opposing team's offense. If the team wins control of the puck, some offensive settings are retained from the even-strength offensive tactic.
So, the starting point in designing your overall system is choosing a specific tactic in each of these four categories. Look over your roster, try to identify what your team's strengths and weaknesses are, and then read over the descriptions of each tactic to find one that suits your team.
Familiarity
You can switch between tactics at any time (except during games). However, a team can't learn new systems overnight. While your team is learning a new tactic, it won't be quite as effective with it. The "Familiarity" indicator shows how well-acquainted your team is with a tactic: red means almost no experience, green means complete understanding of it, with shades of progression in between. As long as you continue using the tactic, familiarity will increase. If you switch away from, its familiarity level will drop (at a rate about half the speed it increased by.) So, if you attempt to install a new tactic and don't like the results, your team probably won't have forgotten to play the old one yet, and you can switch back.
Players may also become upset when a team switches away from a tactic they're very familiar with to one they don't know. This is more likely to happen if your head coach (i.e., you, if you're playing as GM/Coach) has weak motivation abilities and/or your captain isn't a good leader. If a player does suffer a negative reaction to a tactical change, he'll remain irritated for about a month before accepting the change. If you change tactics before that period ends, he may sulk for another month if he doesn't like the new one, either (unless you're returning to one your team is more familiar with.)
Tactical Roles
Tactical roles are, along with positioning and special situation instructions, the building blocks of tactics. Every tactic specifies what type of tactical roles must be filled on its first three lines and defensive pairs for the tactic to be executed properly (if a team uses a fourth line and/or pair, it can set the tactics for those freely.) These requirements take the form of larger categories of roles, within each of which are several individual tactical roles that may be used to fill the requirement equally well.
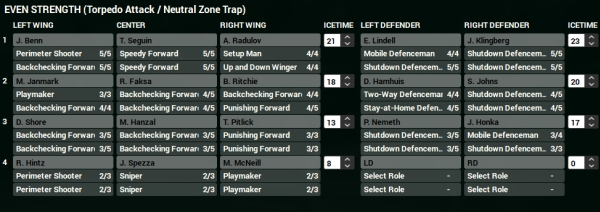
Once a team's lines are selected, there are two tactical role slots below each even-strength line spot (offensive on top, defensive below) and one below each power play and penalty killing line spot. Clicking on that slot will bring up a list of tactical roles that can be given to the player. The currently-selected role will be outlined in white; primary roles (the ideal ones to fill the slot) will be outlined in green, and secondary roles (also acceptable, but at a slight penalty to the tactic's effectiveness) will be outlined in red.
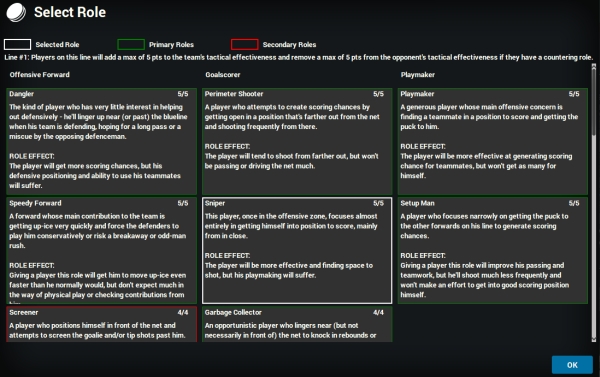
A tactic's role requirements aren't specifically attached to individual positions within the line (or defensive pair), so if a "Playmaker" role is required, it can be given to any of the LW, C, or RW. However, you can only fill the requirement once - if you make the RW your playmaker, you can't give the LW that role (unless the tactic lists two playmaker requirements for that line, which will happen in some cases.) Once a role is filled, the popup for other players will indicate that it's no longer available for selection and which player is currently occupying it.
Tactical Fit
Assigning suitable tactical roles to your players is very important. In the upper-right corner of each tactical role description in the popup, and on the role selection box on the line display, is a numerical rating, e.g. 4/5. The higher the numbers (they go up to 5), the better he is at performing that tactical role. Your team's overall performance with a tactic is very dependent on how well your players fit their roles, so try to amass the highest number you can. If you're seeing a lot of low numbers, you may want to reconsider the tactic your using, as it may not be appropriate for the kind of players for your team (or, you can find some players that can execute it properly.
The number listed before the slash is the actual amount the player is contributing to their team's tactical score. The best possible score for the player is listed after the slash - this is under optimal conditions, i.e. playing at his best position, and on the first line/defensive pair. The left number will be lower than this in most cases, as lines/pairs after the first have a lower maximum contribution to the overall score, and the player may be further penalized if he's playing out of position.
Even-strength Roles
It may be a little confusing at first to see two different roles assigned to players at even strength, particularly if one of them is not of a type you'd normally associate with an offensive or defensive role - say, for example, goalscorer in the defensive slot. What this amounts to is telling the player that you're not particularly concerned with what he's doing defensively, and that he needs to be extremely focused on his offensive production - in other words, don't worry too much about backchecking while your team is defending, but always be ready to head up-ice quickly once you regain possession.
Game Rating Effects
The tactical roles have a very large influence on how the Game Rating (GR) scores are calculated, particularly the Offensive and Defensive sub-ratings. Successes and failures in ways that are particularly important to the role are rewarded or penalized in larger amounts, while things that are less important affect the score to a lesser degree. For example, consider a player who loses a fight but gets an assist in a game. If the player had an Enforcer role, his GR would suffer significantly because of the fight loss, and only be rewarded modestly for the assist (he's out there to fight, not create offense; while that's a nice bonus, it's not his primary job.) However, if he had the Setup Man role, the penalty for losing the fight wouldn't be as large, and the bonus for the assist would be larger (winning fights isn't essential to his role, but setting up goals is, and he succeeded at that.) Remember, the GR scores are an indication of how well the player is performing the job he has been assigned - not just a simple measure of overall performance.
Tactical Role Attribute Effects
Individual Tactical Roles will modify the ratings of the player slightly to reflect what he's been told to focus on. The descriptions of the roles will give you an idea of what exactly will be changed; for example, a player with the Punishing Defenceman role will have his Hitting attribute increased so he hits more often and with greater success. However, there are also ratings penalties applied in equal measure - that big-hitting defenceman will lose some of his Positioning ability, as he'll tend to get out of position while looking to make a big hit.
Special Effects
In addition to the attribute changes mentioned above, some tactical roles have additional special effects while they're on the ice, changing the attributes of opposing players or teammates:
Goons and Enforcers will reduce opponent's bravery, unless countered by presence of the opponent's goons and/or enforcers.
Agitators will lower the Temperament attribute of opponents, leading them to take more penalties.
Crease-clearing Defencemen will lower the screening abilities of opposing forwards.
Shadows will reduce the ability of the opposing line's best player to get into scoring position and make plays.
The Tactical Battle
Every game is a struggle between opposing coaches to successfully influence the course of the game through the way their team executes its tactics. The relative effectiveness of each team's tactics, and the way they interact with the other team's, will determine which team holds the tactical advantage, and to which degree. During a game, each coach can (and should) make adjustments to his players' tactical roles to either win back the tactical advantage if he's lost it, or counter the opponent's efforts to do the same. There are significant player performance effects that occur when a team has the tactical advantage, and penalties when it does not. Getting outcoached can hurt even a team with a talent advantage over its opponent - or a good coaching staff can elevate a team beyond its skill level.
Countering Roles:
A team's tactical roles determine how well it can execute a particular tactic, but they may also provide effective counters to an opponent's tactic. While on the Strategy screen (both pregame and while play is underway), players whose roles are particularly good at disrupting an opponent's tactics are marked as either major (red bar) for the most effective counters, or minor (yellow bar) for the next-most-effective ones.

Changing player roles to add more counters will reduce the opponent's tactical effectiveness, potentially winning back the tactical advantage. Be careful, however, not to sacrifice too much of your player's fit for their roles - if you gain a bunch of red bars at the loss of many points of role fit scores, that may not be a good tradeoff.
Coaching Advantage
The coaching advantage, determined at the start of the game, decides which coach is better at implementing their particular system. It considers their Tactics attribute (and possibly the Tactics attribute of any particularly tactically-gifted assistants, but only to a limited extent - a good assistant will make a head coach who's a bad tactician better, but not good) and the coach's preferred style - a coach who likes to take a very offensive approach with little physical play won't be as successful making a grinding, heavy-hitting defense-oriented tactic work. The results of each coach's calculation (with the home coach getting a slight bonus) are compared to each other, and the higher one wins the coaching advantage.
Holding the coaching advantage does not change the actual effects of a tactic; all it does is confer on the coach the ability to see what the other team's tactical roles are set to and give him the "last change" on role adjustments, making it easier for him to maintain or reclaim the tactical advantage. So, if you have the coaching advantage, you can make your changes knowing exactly what the other coach is doing, and is about to do, with his players' roles. Or, if you don't have it, the AI coach gets the same edge over you.
The coaching advantage can shift as the game is underway - it's recalculated at the start of each period, and the between-period calculations consider the effects of the Momentum in the last period - if a team outshot and/or physically dominated its opponent in the last 20 minutes, its chance of winning the coaching advantage for the next period is improved. There is a momentum indicator at the top-right corner of the game screen (the bar with the visitor logo at one end and the home one at the other) that will indicate which direction the game's momentum is currently running in.
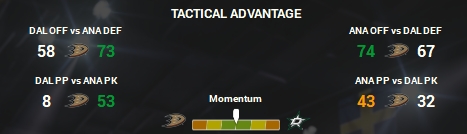
Tactical Advantage
In addition to the effects individual tactical roles have on players, there are even bigger bonuses to be won - or penalties to be suffered - if the team does or does not have the tactical advantage.
Which team currently holds the tactical advantage is calculated by calculating an overall effectiveness score for the team by adding up how well each of its tactics' required roles are being filled, then lowering that total depending on how many Countering Roles (and what kind) are present in the opposing team's lineup.
The game screen shows which team holds the tactical advantage at the top-right, just to the left of the coaching advantage indicator and below the momentum one. The team with the tactical advantage will have its logo highlighted, the other one will be faded.
A team that holds the tactical advantage is successfully imposing their playing style on the game, and, while play is underway, will have all of their players receive additional attribute bonuses for up to three player attributes that are specific to the tactic being used in the current situation (i.e., if the team has control of the puck during 5-on-5 play, it will get the bonuses associated with their offensive tactic; if it's killing a penalty, it well get the bonuses from its PK tactic.) The exact bonuses are not revealed, but the nature of the tactic should give you a strong hint at what they are - a tactic calling for rapid puck movement can be assumed to be giving a bonus to passing skills if its team has the tactical advantage.
The team that doesn't hold the tactical advantage suffers the opposite effect - they get penalties imposed on up to three attributes. This reflects the breakdown of their tactic, exposing its weaknesses. Similar to how the bonuses reflect ways in which the tactic can succeed, the penalties are derived from the ways it can fail. If the puck-moving tactic mentioned in the previous paragraph loses the advantage, its team may find itself getting caught in poor defensive position more often (lowered positioning and/or defensive read skills) as they turn over the puck in precarious situations.
The relative degree of the tactical advantage is considered when deciding how many bonuses or penalties to award. A wide disparity between the two team's tactical effectiveness means three attributes will be affected, a narrower one will only mean one bonus or penalty. If the difference is particularly extreme, the amount of the bonuses and penalties will be increased.
Changing Roles
Coaches are allowed to change tactical roles while a period is underway. Tactical advantage is recalculated whenever a player's tactical role is changed, so it's possible to regain the advantage during play by making an in-period change.
Global Tactics
In addition to the special situations that are controlled by individual tactics, each coach also gets some leeway to set some particular tendencies for his team. These can be adjusted in the Global Tactics box of the Strategy screen.
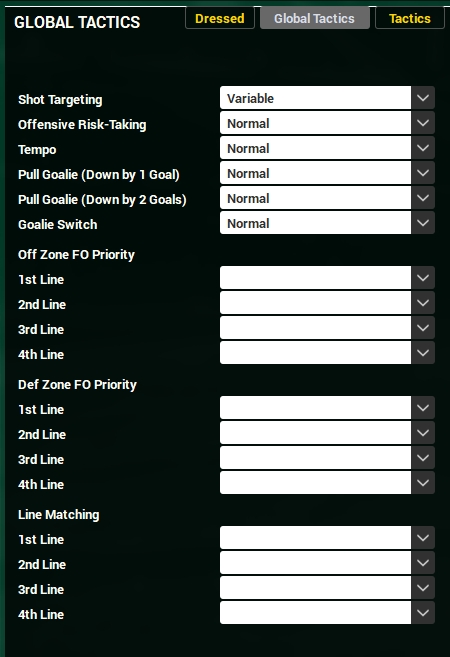
Shot Targeting allows you to tell your team to attempt at a certain spot in the net, in order to take advantage of a perceived weakness in the opposing goalie. Attempting to hit a specific target (anything other than "variable") will result in a higher percentage of shots that miss the net entirely.
Offensive Risk-Taking determines how your team behaves when they have the puck. The low-risk options mean they will usually only make "safe" plays that are unlikely to give the puck away. High-risk options will give the puck away much more often, but are also more likely to generate spectacular results like breakaways and other high-percentage scoring chances.
Tempo dictates the pace at which the team will play when they have the puck. Low tempos mean they will tend to slow things down, useful while killing penalties or protecting a lead. Higher tempos mean quicker decision-making, which can be riskier but can generate more offensive chances in a shorter period of time.
Pull Goalie (Down by 1 Goal) specifies the maximum number of seconds remaining in the game before you will attempt to pull your goalie for an extra attacker while down by one goal.
Pull Goalie (Down by 2 Goals) specifies the maximum number of seconds remaining in the game before you will attempt to pull your goalie for an extra attacker while down by two goals.
Goalie Switch determines how quickly your goalie will be pulled if he gives up several goals early or in rapid succession (assuming you don't pull him manually.)
Offensive Zone Faceoff Priority will determine which of your lines have the highest priority when a faceoff takes place in the other team's end of the ice. Your lines are listed to the left, and their priority in the dropdowns - if the 3rd Line is set to "1st", for example, it's likely to be sent out when an offensive zone faceoff occurs and it's well-rested enough to play.
Defensive Zone Faceoff Priority: will determine which of your lines have the highest priority when a faceoff takes place in your own defensive zone and you're capable of changing lines (i.e., not after you've iced the puck.) Your lines are listed to the left, and their priority in the dropdowns - if the 3rd Line is set to "1st", for example, it's likely to be sent out when a defensive zone faceoff occurs and it's well-rested enough to play.
Line Matching will determine which of your lines will tend to be matched against which of your opponent's lines (assuming you don't directly intervene in their selection.) Your lines are listed on the left, the line you want to try to match them to is listed on the right. You're more likely to succeed in matching when you have home ice, since you're allowed the last line change.