| Find in this manual | ||
| Replace with | ||
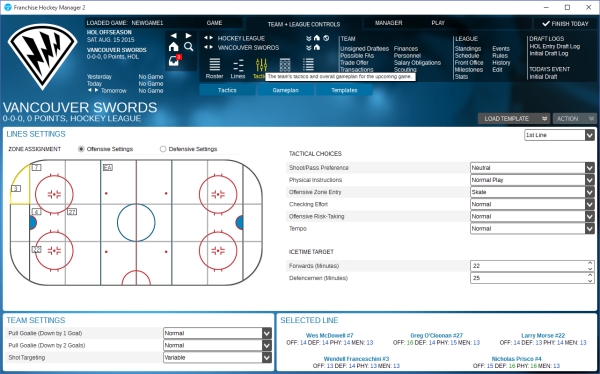
The Tactics screen allows you to determine how your team will respond to in-game situations. There are three tabs in this screen: the main tactics tab, the Gameplan (a set of override instructions on which tactics to use and when), and Templates (the editing and import/export mode for tactics.)
Tactics are set at the line level, so your choices on the Lines screen should be made before working on your tactics. The bottom-right corner of the screen shows which line's tactics are currently being adjusted, and the dropdown menu at the top right, above tactical choices, allows you to change the selected line. The game comes with a standard set of tactical templates which can save you the trouble of setting everything yourself; you can load one of these by using the Load Template dropdown list and picking whichever one you want. Each template contains a full set of instructions for every line, so changing templates will change what each line is told to do - not just the one you're currently viewing.
The heart of the new tactical system is the Zone Assignment display. Here, you can instruct your players where to go when the puck is in any given situation. The Offensive/Defensive settings button identify whether you're describing a situation where your team has the puck (offensive) or it's in the possession of your opponents. The ice is subdivided into 24 zones, and, combined with the offensive/defensive choice, gives you 48 separate sets of instructions for each of your players.
Select the currently active zone by clicking on it (right-clicking is usually safer, as left-clicking can result in accidental player moves, but some users may find left-clicking more convenient.) In Offensive Settings mode, the rink orientation is your goal on the left, your opponent's on the right; this is reversed in Defensive Settings (if you view this screen during a game, it doesn't actually reflect which ends of the ice your team is currently attacking/defending.) A player's currently assigned zone is identified by his jersey number; you can click-and-drag the number to change the zone.
Zone assignment determines where each player on a line should be located with the puck in a given situation – where it is on the ice, and who controls it.
The location of players impacts their ability to influence the outcome of a play. The ratings of players who are supposed to be near the current location of the puck or its destination will be incorporated into determining the next thing that happens in the game.
For example, if the LW and LD are both assigned to come back to the corner on their side when the other team has the puck there, the double-teaming means a better chance of separating the puck carrier from the puck.
But if the puck carrier decides to cycle the puck back up the boards, it will be easier for him to complete the pass to a teammate waiting there, since he’ll presumably be unguarded.
If the LW had been assigned to stay along the mid-boards, he’d be in position to lower the chance of that pass being completed, but then the LD would be alone with the puck carrier and there would be less chance of taking the puck away from him. If a team is shorthanded, their opponents will find it easier to move the puck, since the shorthanded defenders are spread more thinly across the ice.
The Tactical Choices settings offer five general preferences that are applied to the currently chosen line:
The Shoot/Pass Preference determines whether the line will attempt to shoot as often as possible (often from an angle or situation where the chance of a goal is low) or sacrifice shot quantity for quality by looking to make a pass to a teammate in a better scoring position.
Physical Instructions tell the line what approach to take with regard to the physical side of the game: a low-risk style designed to minimize penalties at the risk of giving your opponent more room to maneuver, a bruising style that may result in more penalties and fights but lead to more big hits and aggressive checking from your players, or a neutral option.
Offensive Zone Entry selects the line's tendency to use different methods of entering the opponent's end of the ice with the puck. Skate will mean the puck carrier will usually carry it in himself and try to establish position or beat the defenders on his own, Pass will mean he'll look for an open teammate in better position to enter the zone, and Dump will mean he'll throw the puck deep into the zone and he and/or his teammates will attempt to recover it before the defenders can.
Checking Effort selects the line's approach when defending. The passive options mean they will try to maintain proper position on the ice and take away passing and skating lanes. The active options mean more chasing of the puck carrier. Generally, active checking is riskier but will cause the opposition to give the puck away more often.
Offensive Risk-Taking determines how the line behaves when they have the puck. The low-risk options mean they will usually only make "safe" plays that are unlikely to give the puck away. High-risk options will give the puck away much more often, but are also more likely to generate spectacular results like breakaways and other high-percentage scoring chances.
Tempo dictates the pace at which the line will play when they have the puck. Low tempos mean they will tend to slow things down, useful while killing penalties or protecting a lead. Higher tempos mean quicker decision-making, which can be riskier but can generate more offensive chances in a shorter period of time.
The Icetime Target settings specify how often this line and defensive pair should be used. The even-strength lines get a minutes target that indicates how many minutes this line/pair would play in a theoretical 60-minute game with no penalties called. The special teams lines have this number expressed as a percentage of the time this line should get played in that situation.
Please bear in mind that the AI will make line choices depending on many different factors, and your icetime targets are only a general guideline - if they cause severe fatigue problems for a particular line, for example, the computer will give them more rest than you've instructed.
The Team Settings offer a few options that are applied to all lines:
Pull Goalie (down by 1 goals) specifies the maximum number of seconds remaining in the game before you will attempt to pull your goalie for an extra attacker while down by one goal.
Pull Goalie (down by 2 goals) specifies the maximum number of seconds remaining in the game before you will attempt to pull your goalie for an extra attacker while down by two goals.
Shot Targeting allows you to tell your team to attempt at a certain spot in the net, in order to take advantage of a perceived weakness in the opposing goalie. Attempting to hit a specific target (anything other than "variable") will result in a higher percentage of shots that miss the net entirely.